Butterfinger Caramel Bars are a no bake dream! Gooey, crunchy and easy!
Sometimes inspiration runs dry. It does.
I wonder how many possible combinations of butter, sugar and candy I can possibly make, eat, write about and photograph. And some days…like recently…I feel like the day is just around the corner.
My inspiration is going to take a step in the street, not look both ways and get violently run over by a speeding car like Brad Pitt did in Meet Joe Black. Did you guys see that movie a million years ago? Was that scene really necessary movie makers?
But unlike Joe Black I don’t anticipate my inspiration to come back looking like Brad Pitt, talking super softly and looming in dark corners. I just expect one day to wake up and have it be gone.
BUT you know what happens on days like that? When my inspiration “Joe Blacks” on me? I get emails from you people. You are sort of the greatest with your ideas and chatty correspondence.
So, today’s inspiration was borrowed from Loren. I’ve never met Loren, but she hooked me up with a great no-bake idea. I kinda turned the idea on its head, but I know Loren expected this…
Let’s talk candy, marshmallows and caramel…AND you don’t have to turn on your oven.
Butterfinger Caramel Bars

Here’s what you’ll need… I found some already unwrapped Butterfinger bites. Seriously, candy makers…you’re making it far too easy. Or totally use regular Butterfinger bars. I’ve done it both ways.
Chop them up a little bit…not too much, but a little. Line your 9×9 pan with foil…and layer graham crackers in the bottom.
 Top the graham crackers with some mini marshmallows…
Now you’ll need some caramel. I used these chick pea looking caramel bits. They are really lovely because you don’t have to unwrap them.
And also, yes…you can use caramels you have to unwrap too. Again, I’ve done it both ways.
Melt those with a little milk and pour it on top of the marshmallows and graham crackers.
You’ll need to spread it a little with a spoon, making sure the caramel gets down in all the gaps. The marshmallows might melt a bit, nut that’s no problem.
Now press your chopped Butterfinger on top of the caramely, marshmallowy stuff. And if you want, you can drizzle some more chocolate up on there. I encourage it, actually.
Chill the whole thing for a bit. When it’s set remove the foil from the pan…
And pull the foil from the sides…
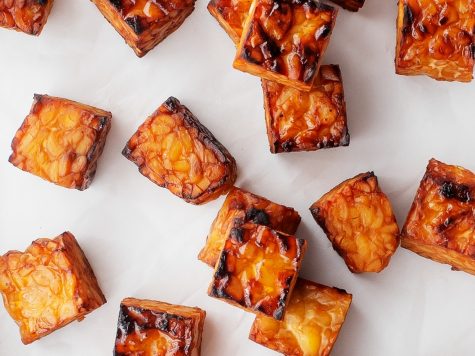
And slice!

No-bake has never looked so good!
Butterfinger Caramel Bars

Ingredients
- 6½ graham crackers
- 2 cups mini marshmallows
- 1 (11 oz) bag Caramel bits
- 2 Tbsp milk
- 1 (10 oz bag Butterfinger Bites, coarsely chopped
- 2 oz semi-sweet chocolate (for drizzle)
Instructions
- Line a 9×9 baking pan with foil, allowing foil to hang over the edge for easy removal.
- Spray foil with cooking spray.
- Place graham crackers on bottom of the pan, breaking to evenly fit.
- Sprinkle marshmallows evenly over graham crackers.
- Melt caramel and milk together in a microwave safe bowl for 1 minute. Stir and continue heating in 30 second intervals until melted.
- Pour caramel over the marshmallows and gently spread until evenly coated. The marshmallows will melt slightly, which is fine. Make sure to coat evenly so the caramel sticks to the graham crackers.
- Sprinkle chopped Butterfinger on top and and press the candies into the caramel/marshmallow mix.
- Melt semi-sweet chocolate in a microwave safe bowl on high power in 30 second intervals until melted.
- Drizzle semi-sweet chocolate on top of Butterfinger.
- Chill in refrigerator for 1 hour or until set.
- Cut into bars when ready to serve.
Notes
Store and serve bars at room temperature in an airtight container for up to a week.
3.5.3226
This recipe was originally posted in May 2012, with the finished product photos updated in August 2017.
![]()