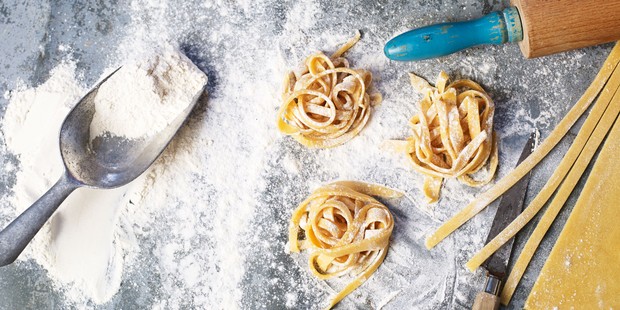
Making pasta from scratch is both fun and satisfying. It takes practice, but with the right knowledge and tools you’ll be on the right track in no time.
Read on and discover how to make two types of dough, the two most widely used in Italy – an egg dough, and a flour and water dough. The egg dough is more widely used in the north of Italy, and the flour and water in the south, though, of course, there is some cross-over. Once you’ve mastered the techniques, try our favourite pasta recipes for sauce inspiration.
What tools do I need?

The flour and water dough is the best for beginners as there is no specific equipment needed – it can all be done with your hands. You can buy some tools for specific shapes but it isn’t essential.
For an egg dough I would recommend investing in a pasta machine. Of course, the original way to roll pasta was with a rolling pin but without the right instruction, a lot of practice and a very long rolling pin, it is difficult to get it thin enough and to the right consistency – it’s a whole separate thing in and of itself. Below, I will go through how to use a pasta machine to roll the dough out. There are various different levels of machines so you don’t need to spend a fortune.
If you want to make filled pasta you can buy all sorts of cutters and shapes but you can go a long way with just a good, sharp knife.
A dough scraper is very handy for forming the dough and cleaning up all of the pesky bits that get stuck to your work surface. And on work surfaces – a large wooden board will make your life a lot easier when it comes to kneading and shaping both doughs. I’d suggest saving one that you use only for pasta, pastry and bread – strong flavours like garlic and onion can stick to a board and taint the flavour of your pasta. Untreated wood is best and something with a lip that grips the surface will keep it from moving around.
What are the ingredients?
For an egg dough, all you’ll need is ’00’ flour and eggs. ’00’ flour is wheat flour that has been put through the mill twice so it is very fine. It has a higher protein count than plain white flour, which is important for the structure of the dough. It is much more widely available nowadays and can be found in most large supermarkets. On the matter of the eggs: good eggs make a huge difference so try to buy organic and free-range whenever possible. To get a good colour on your dough, choose eggs with a rich yolk e.g. Burford Browns or St Ewes.
For the flour and water dough, you will need semolina flour (also called durum wheat flour). This is a course type of flour but is more finely ground than semolina, so make sure you buy the right type. It is not readily found in supermarkets – I usually buy it online or in specialist shops or delis.
How to make homemade pasta dough
The recipes for both doughs are below. I always recommend forming the dough using your hands rather than a food processor as you learn so much from feeling the dough. Many factors, including the temperature and humidity of the room, the freshness of your flour and the size of your eggs can all influence how your dough feels and acts on any given day. You may need to add a touch of water to the dough if it feels too dry or another dusting of flour if it feels too wet. It’s important to get a feel for the dough and learn what it needs, therefore using your hands is best.
What sauce should I use?

This is mostly up to you, though some sauces definitely pair better with certain shapes. A general rule is to pair a heartier sauce with a more robust pasta, for example, a meaty ragù or bolognese would go well with pappardelle or tagliatelle (not spaghetti). Wider tubes, like rigatoni or paccheri, as well as shells like conchiglie are also good for chunkier sauces because of their surface area. Finer strands like spaghetti, linguine or vermicelli are good for thinner sauces like a smooth tomato sauce, an oil-based sauce or something creamy. The same can be said for the twisty shapes as the sauce collects in all the little nooks and crannies.
If you’ve made stuffed pasta and you want the filling to sing, keep the sauce simple rather than something that will overpower those flavours – you can’t go wrong with butter and sage. Get creative and find your favourite from our pasta sauce recipe collection.
Egg pasta dough recipe

The measurements below will give you enough for a main course for four people. If making filled pasta or lasagna, it will stretch further, enough for around six portions.
NOTE: a basic pasta machine will have 6 settings (sometimes number 1 will be the widest and 6 the narrowest but they can be the opposite way around too). On a machine like this I will almost always take the pasta to the narrowest setting, sometimes running it through it twice. More advanced machines will have more settings to take the dough even thinner which is nice for some shapes but will be too delicate for others.
Serves: 4
Ingredients:
400g ’00’ flour
4 large organic eggs
semolina flour or durum wheat flour, for dusting (or use more ’00’ flour if that’s all you have)
Method:
- Pour the flour into a mound on your work surface and use your fingers to create a wide well in the middle, making sure the rim is not too low. Crack the eggs into the well and beat them lightly with a fork for around a minute until the whites and yolks are completely combined.
- Slowly draw a small amount of the flour into the eggs with your fork, whisking continuously and squashing any lumps as you go, so you start to make a smooth mixture that looks like cake batter. Keep going until the eggs are no longer runny. Use your a dough/bench scraper or a knife with a wide blade to bring the rest of the flour from the outside in, cutting it into the middle until you have a shaggy mass.
- Now the hard bit – kneading. You’ll need to knead the dough for a minimum of 15 mins, more if you’re doing a larger amount. Use the heels of your palms to push the dough away from you so that it flattens and rolls away from your body. Use your fingers to pick up the edge farthest from you, fold it back into the dough, folding it in half and then turning it 90 degrees clockwise. Repeat this motion (you will get into a rhythm) making sure to always turn the dough in the same direction. You may find it easier to use both hands or just one, as long as you’re working the dough, rolling, pushing and stretching it – that’s the main thing.
- Try to work quickly to prevent the dough from drying out but make sure you knead it for long enough. Keep a bowl of water nearby for if your dough is ever feeling too dry. Dip your hands in the water, then continue to knead with damp hands. This adds moisture to the dough and gives you a lot more control over how much you add. If the dough feels too sticky, dust the board with flour and knead again to incorporate.
- Knead until your dough is smooth, tight and elastic. To test that it’s had long enough, push down on it with a finger – it should bounce back quickly. You can also use a sharp knife to cut down the middle of the dough – lots of small, trapped air-bubbles is a great sign.
- Leave the dough to rest, covering it with an upturned bowl or wrapping it in cling film. Leave for a minimum of 30 mins at room temperature to allow the gluten to relax before rolling out. You can leave it well covered/wrapped in the fridge for up to 2 days, bringing back to room temperature before rolling. You can also freeze the dough at this point, wrapping it well in cling-film. It may discolour in the freezer but it won’t affect the quality too much.
- Divide the dough into four pieces, keep one out to use and the others well covered. Roll out the first piece a little using a rolling pin or just flatten it with your hands until it will go through the widest setting of your pasta machine comfortably. Roll it through the widest setting, then fold each end in on top of themselves like a book and pass it though (narrow end first) the same setting again. Repeat this folding and rolling through the wide setting four or five times – your dough should start to feel silky smooth. Next, pass it through each setting once – starting from the widest and working your way down. How you are cutting and shaping your pasta will determine which setting to stop on and how thin you want to take your sheets, but a good marker for most pasta is that you should be able to see your hand through the sheets when held up to the light. Feel free to cut the sheets in half if they’re getting too long to handle.
Lay rolled sheets on to a work surface lightly with flour (semolina flour is preferable) and proceed to cut and shape your pasta as desired.
For long pasta
Leave the sheets to dry for 10 mins or so, turning them every so often (the time will depend on the temperature and ventilation of the room). It’s ready when it is still pliant enough that it doesn’t crack but no longer at risk of sticking when rolled up.
You can either feed the sheets through your chosen setting on the pasta machine attachment or cut them by hand. To cut by hand, dust the sheets with semolina flour then roll them from one end to the other to form a log. Use a sharp knife to cut along the log to your desired width (around 2cm for pappardelle and ½cm for tagliatelle). Toss the ribbons with semolina flour. The pasta can be cooked right away or left to dry for longer storage. To do this, pick up a portion of strands in one hand, using the other hand to lightly curl them around the first hand into a nest. Arrange on clean tea towels or on a board dusted with semolina flour, and leave in a well-ventilated space for a minimum of 24 hrs, until completely dry and brittle. Store in an airtight container or tin that is lined with kitchen paper and leave in a cool, dry place. Use within the following weeks. Alternatively, the nests can be frozen flat for longer storage. Pasta cooked immediately will need very little time in the water. For dried fresh pasta or frozen fresh pasta allow another few minutes cooking time, tasting for doneness.
For filled pasta
For filled pasta the dough should be thin (remember that you will be folding two sheets on top of one another to seal the dough), but not so thin that the filling weighs it down and rips it. Setting 6 is usually right but trial and error is your best tool.
Do not leave the dough to dry before shaping; you want to work with fresh sheets that feel tacky. As you form the filled pasta, cover any strips of dough that you are not working with using a slightly damp tea towel.
If you are not cooking filled pasta right away, freeze flat on semolina-dusted trays, then bag them up once frozen hard. Cook from frozen, allowing an extra minute or so to boil, tasting for doneness.
Semolina pasta dough recipe

Serves: 4
Ingredients:
400g semolina flour (semola rimacinata)
Approx. 190-200ml tepid water
Method:
- Pile the flour onto a clean wooden board. Use your fingers to make a well in the flour, then pour the water in slowly. Start by adding 190ml, then adding the rest later, if you need to.
- Cut the flour into the water using a dough scraper or a knife with a wide blade, starting from the outside and cutting into the middle to combine. You will have a shaggy mess. Now use your hands to scrunch the dough together, picking it up and using it like a sponge to mop up any bits of dough that haven’t yet been incorporated.
- Start to knead the dough. Use the heel of your palms to push the dough away from you and your fingers to pull it back, turning the dough clockwise as you go in a continual motion. Knead for around five minutes – it should feel soft, smooth and robust but not sticky or elastic, and similar to plasticine in consistency. Keep a bowl of water on the side, dampening your hands and kneading with wet hands if the dough feels too dry.
- The dough can be shaped straightaway. Divide into four portions, keeping the pieces that you’re not working with covered with an upturned bowl to stop them from drying out. Roll each piece first into a sausage between the palms of your hands, then into ropes approx. 1cm wide, rolling them back and forth across your board under your palms.
How to make cavatelli
Cut along the length of the ropes into nuggets approx. 1cm each. Use a cavatelli board, the prongs of a fork or the fine side of a box grater to roll each nugget along the textured surface using the side of your thumb. Let it curl over your thumb and fall off, leaving you with small curls with texture on one side.
How to make raschiatelli
Cut each nugget roughly 2cm wide. Roll each piece back and forth a few times across the board under your palm to thin it out slightly. Use your index finger and middle finger to press down onto the piece of dough and drag it towards you across the board. It will curl over your fingers and look like a pea pod. You can make smaller ones, if you prefer, by cutting the nuggets to 1cm each and using two fingers.
How to make orecchiette
Roll 1cm nuggets into balls. Using a blunt knife with the blade facing away from you, press the blade down into the piece of dough at the edge farthest from you at an angle and drag it along the board towards you. It should curl over the knife. Pick it up and off the knife and turn it inside out, pushing your thumb into the crevice to help create a dome shape.
How to cook fresh pasta
Once you have shaped your pasta, you can cook it straightaway, leave it out to cook later that day, or freeze it flat on flour-dusted trays (I prefer to freeze this pasta than to let it dry as I think it retains its texture better). It can be cooked straight from frozen, allow a few more minutes of cooking time, tasting for doneness.
Enjoyed these recipes? Try other Italian dishes
Top 10 Italian dessert recipes
Video: how to make focaccia
Italian cocktail recipes
Italian recipe collection
What’s your favourite pasta recipe? Leave a comment below.


