How to make milk kefir, a probiotic-rich fermented drink that has lots of health benefits! It’s easy to make at home and so much better than store bought kefir.
Milk Kefir
I have talked about my love for kefir on Instagram stories and every time I get a ton of questions and requests for me to write a blog post about how to make kefir. Today is the day! We are talking all about kefir! My friend, Tanna, introduced me to kefir. I attended one of her kefir classes and learned SO much. She is the kefir, probiotic queen and I so glad she showed me her kefir ways because I love it! I have been hooked ever since.
So let’s get started. First of all, what is kefir? Kefir is a cultured, fermented beverage made from milk. Kefir has a tart, creamy flavor, kind of similar to buttermilk or plain yogurt.
Benefits of Kefir
Kefir is packed with nutrients and probiotics. It is very helpful for digestion, gut health, a healthy immune system and even mental health. Kefir is also a great source of protein, calcium, and B vitamins.
I have been drinking kefir almost every single day for about a year and I am a believer! I just feel better! My gut is so much happier, I don’t get sick as much…and if I do, I bounce back quickly. I should note, I am not a doctor, I am just sharing my personal experience with kefir. I love it and it is working well for me and my overall health, but please consult your doctor if you have any questions:)
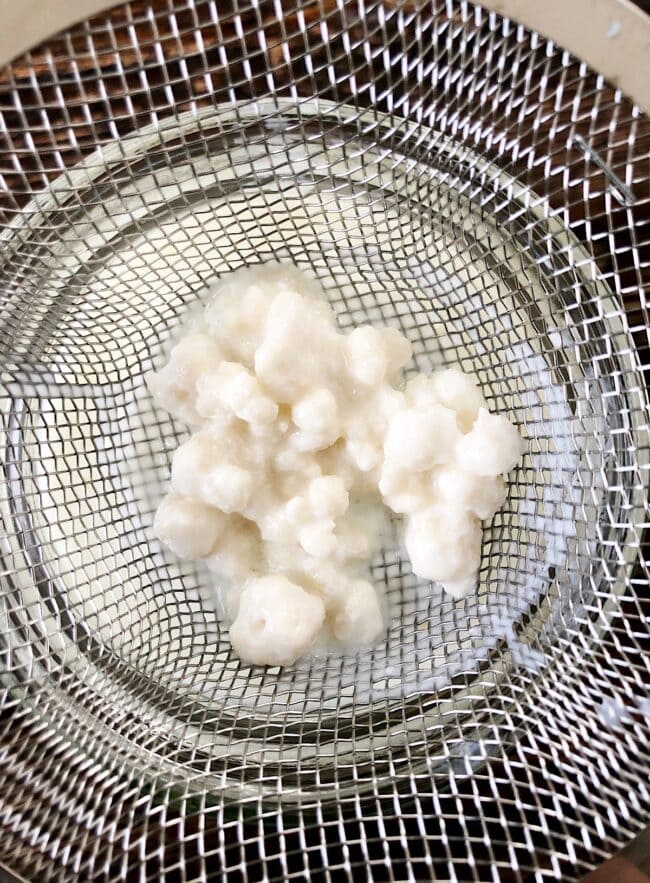
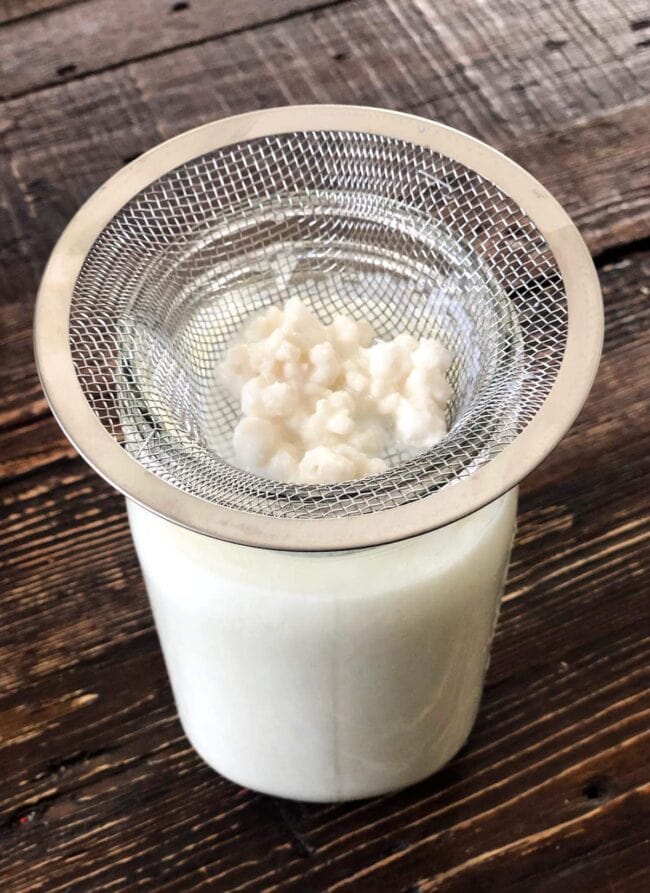
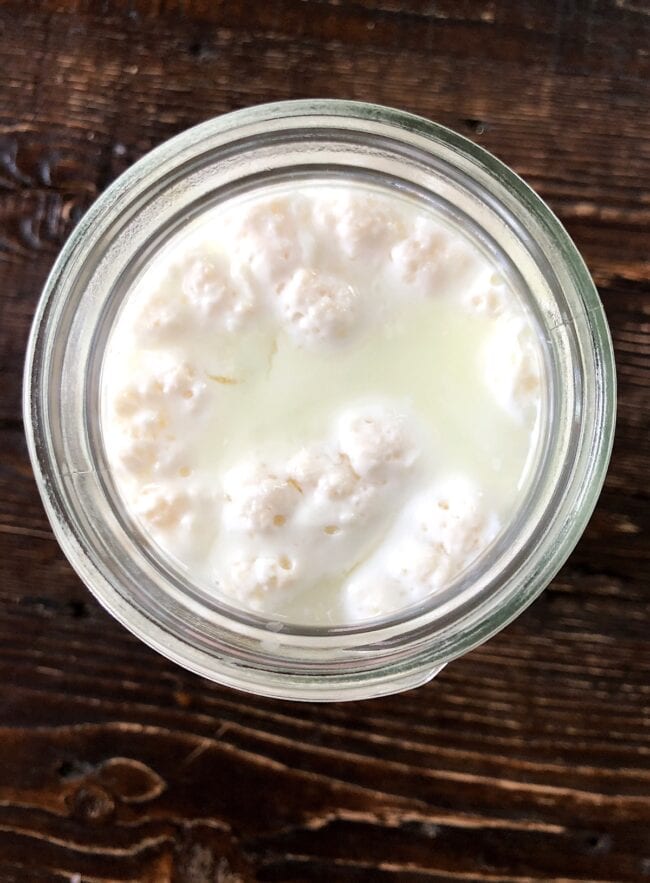
Kefir Grains
To make kefir, you need kefir grains, which are the starter grains. The starter grains are a combination of yeast, milk proteins, and bacteria. They kind of look like cottage cheese:)
Kefir grains are available in some health food stores, as well as online. You can also ask around to see if any of your friends or neighbors have extra kefir grains they want to share. Kefir grains grow with each batch, so people who make their own kefir are usually happy to share their extra grains. I got my grains from my friend Tanna and have since shared with a few friends. It’s fun to share the kefir love:) And kefir grains will grow so you will need to eventually share or you can feed them to chickens or dogs.
You can purchase live kefir grains here. I don’t recommend dried kefir grains, start with live grains for best results.
Supplies to Make Kefir
Yes, you can buy kefir at the store but I like to make my own because it doesn’t have any added flavorings or sugars, it’s more affordable, and it really is easy to make!
To make milk kefir, you will need the following:
- Kefir Grains-You will need about 2 teaspoons of kefir grains to get started!
- Glass Jars-Glass won’t react to the acidity of the ferment and glass is BPA free. Use quart size (32 oz) wide mouth glass mason jars. Buy a set so you always have clean jars. DO NOT use the metal lids that come with the jars. Metal should not be used as a culturing vessel or for any item that will have contact with the kefir grains.
- Plastic Lids-Only use plastic lids to cover the jars.
- Stainless Steel or Plastic Mesh Strainer-Only use stainless steel or plastic. Avoid metal strainers and fine mesh strainers, they are too small and make it difficult to strain. I use this strainer.
- Cow’s Milk or Goat’s Milk-Use whole milk, 2% or 1%. Skim milk is not recommended. Ultra-pasteurized or lactose free milk will NOT work. Coconut milk can be used but you have to revitalize the kefir grains in animal milk for 24 hours, every few days. The thickness of your kefir will depend on the type of milk you use. I make my kefir with 1% cow’s milk and it works great!
- Plastic Spoon or Wooden Spoon-never use a metal spoon when dealing with kefir.
How to Make Milk Kefir
I like to do my “kefir routine” every morning. It only takes about 5 minutes. Let’s get started!
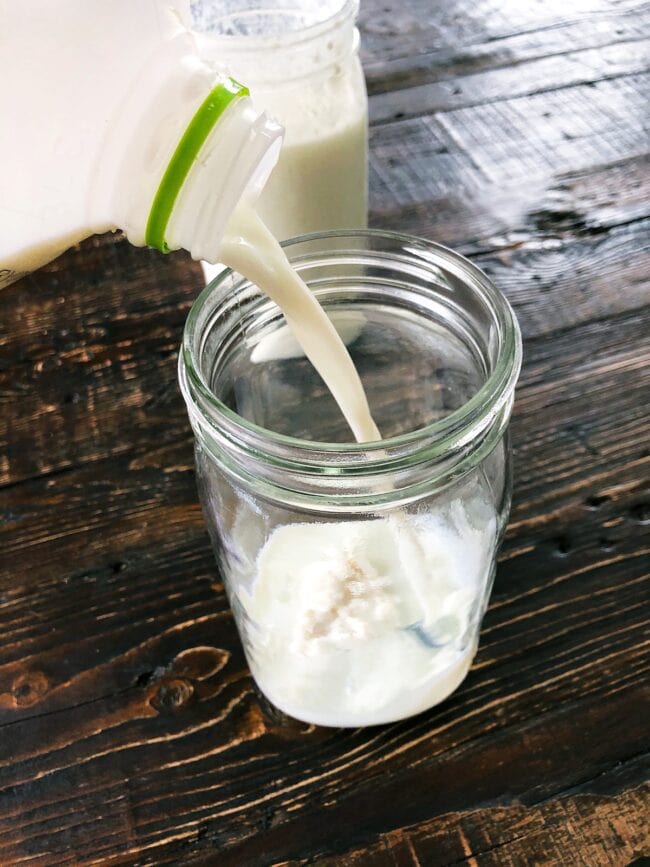
- Put the kefir grains, about 2 teaspoons, into a clean glass jar with about 3 cups fresh milk. Make sure you leave about 1-inch of room at the top of the jar.
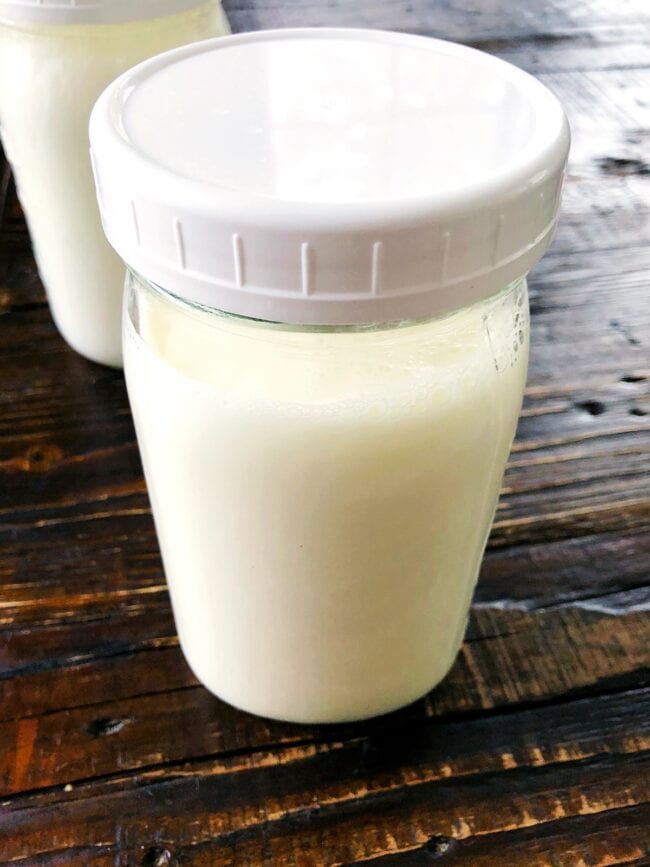
- Place a plastic lid on top of the jar, but do not tighten it. You want the lid to be loose on top of the jar.
- Place the jar in a warm place, out of direct sunlight, for 24 hours. I put my jar in a cabinet in our kitchen. You will know your kefir is done when it has slightly thickened and smells fermented. It will also be bubbly, you will be able to tell. It could take a little less than 24 hours or a little longer, it just depends on the temperature of your kitchen. I like to do my kefir routine the same time every morning so it is always right around 24 hours.
- Tighten the lid and shake well. Place a stainless-steel strainer or plastic strainer over a clean jar. Strain the kefir into the jar. To help the thickened milk kefir move through the strainer, you can gently tap the strainer gently against the side of the jar.
- At this point, you can add fresh or frozen fruit if you want to do a second fermentation. I add a half of a banana and then put the lid on tight and let the kefir sit out on the counter for another 2 to 5 hours. This will double the amount of probiotics. If you don’t want to do the second fermentation, you can put the lid on and store the kefir in the refrigerator.
- Now, you start the process over again with the kefir grains you have in the strainer. You don’t need to rinse the kefir grains. Put the kefir grains in a clean jar, add milk, put the lid on (but not tight) and repeat the process.
How Long Does Kefir Last in the Fridge
Kefir milk will keep in the refrigerator for up to 3 weeks. I always give it a good shake before using.
If you need to give your kefir a break because you are going out of town or have too much kefir, you can put the grains on pause.
Put the kefir grains in a clean jar with about 3 cups of fresh milk. Put the lid on and place immediately in the refrigerator for up to one week. When you are ready to start making kefir again, put the grains in fresh milk and discard the milk they’ve been sitting in. Start the process over again.

Ways to Use Kefir
Once you start making kefir, you will have A LOT of kefir because you have to make it every day. Our fridge is always full of kefir and our entire family drinks it, even the boys. I make kefir smoothies for us every morning. I also use kefir in as many recipes as possible. I also recommend finding friends to share your kefir with!
And remember, you can always put your kefir on hold if your fridge starts looking like a kefir factory:)
Here are our favorite ways to use kefir:
- Smoothies-my FAVORITE way to use kefir. I make a kefir smoothie every single morning. You can use kefir to replace any milk. My go to is my Secret Ingredient Healthy Smoothie. The boys love it too!
- Kefir Drink-you can drink kefir plain, but it is pretty tart. To sweeten it up a little, add a little fruit and honey or pure maple syrup and blend. If you did the second fermentation, you can just blend the fruit that is in the jar. It will stay good in the fridge.
- Buttermilk Substitute-Use plain kefir in place of buttermilk in recipes. We make kefir biscuits, muffins, pancakes, and waffles all of the time. Note-when you cook with kefir, it will kill the healthy bacteria, but there are still lots of other nutrients and when you have a lot it’s great to use it in recipes so it doesn’t go to waste.
If you aren’t used to drinking kefir, start slowly to allow your body to get used to the extra probiotics, just to be safe:)
If you try making homemade kefir, let me know how it goes! I am seriously a fan!
- 2 teaspoons kefir grains
- 3 cups fresh milk (cow or goat milk)
-
Put kefir grains, about 2 teaspoons of grains, into a clean glass jar with about 3 cups fresh milk. Make sure you leave about 1-inch of room at the top of the jar.
-
Place a plastic lid on top of the jar, but do not tighten it. You want the lid to be loose on top of the jar.
-
Place the jar in a warm place, out of direct sunlight, for 24 hours. I put my jar in a cabinet in our kitchen. You will know your kefir is done when it has slightly thickened and smells fermented.
-
Tighten the lid and shake well. Place a stainless-steel strainer or plastic strainer over a clean jar. Strain the kefir into the jar.
-
At this point, you can add fresh or frozen fruit if you want to do a second fermentation. I add ½ banana and then put the lid on tight and let the kefir sit out on the counter for another 2 to 5 hours. This will double the amount of probiotics. If you don’t want to do the second fermentation, you can put the lid on and store the kefir in the refrigerator.
-
Now, you start the process over again with the kefir grains you have in the strainer. Put the kefir grains in a clean jar, add milk, put the lid on (but not tight) and repeat the process.
Read the post for more tips and where to buy supplies, etc.