In the months before my wedding, I periodically suggested I might like to make our wedding cake (because most giant wedding cakes are terrible) and was swiftly shot down by everyone who heard it. “You’re crazy.” “It’s too much work.” “Do you want to spend your Special Day covered in frosting?” And so I relented and our wedding cake tasted like processed awfulness and it bothered me so much that I volunteered to make the wedding cake for friends a few years later, in 2008. At the end of this fun but exhausting endeavor, I declared the accounting of terrible and wonderful wedding cakes in the universe to be infinitesimally more in balance and making wedding cakes to be “completely out of my system.” That lasted about nine years, when one of my oldest and favorite-est friends got married in 2018. However, I waited completely until the last minute to start it and while we loved it in the end, the absolutely-my-fault stress/chaos of the project definitely set the clock back on me making another wedding cake for at least another nine years. But a mere year and a half later, another fabulous friend got engaged to another wonderful guy and that brings us up to a couple weeks ago: wedding cake three. Three wedding cakes in, I’ve learned a lot of stuff that doesn’t fall in your usual wedding cake baking guide and since I’m definitely never making another wedding cake (“I mean it this time!” I say with such thin resolve it’s clear even I don’t buy it anymore), I think we should start here.

How to | Cake Details | Recipes | Buttercream Flower Garden
How to really make a wedding cake
1. First, a reality check. Here’s the thing: Baking a delicious cake for people you love is not hard; it’s very doable and lovely and even feels good. Baking a cake to feed an entire wedding reception is a whole other thing. It is a logistical challenge that few home kitchens have been designed to accommodate, let alone city kitchens with a single counter, small oven and fridge. As soon as the headcount is over 80 people, you’re likely looking at a tier that’s 14 inches, which is larger than small city ovens can fit, and the absolute outer limit of the Whirlpool masterpiece my building has graced my kitchen with. Each layer of a 12-inch cake may fill a 5-quart KitchenAid bowl, so you’ll make each as a separate cake recipe. And that’s just the tip of the iceberg.
Things happen that if you were a baker at a bakery who did this all day, would be a small inconvenience but at home can be utterly derailing. I curdled a dozen-egg batch of custard on my second wedding cake (and yes, of course I didn’t have a dozen eggs to spare). On this third one, I realized the cake was shrinking more than I’d expected at larger sizes (don’t worry, I’ve since fixed the recipe), meaning that once trimmed my 12-inch tier was more like 10-inch and… woefully short on servings, leading to a bonus day of baking 14-inch layers and just so many (fine, three) gray hairs. Ovens break, stand mixers break — it’s all happened to me. There hasn’t been a single Wedding Cake Week in which I haven’t fallen behind in every other area of my life.
This doesn’t mean I regret any of them. There are lots of reasons to do it anyway: To see the shock and surprise and delight on people’s faces when they bite into a cake that actually tastes like a dream. Because (once your kitchen has recovered) you’ll admit that it’s more fun than buying a place setting of china. Because you’re only going to do it once and then it will be out of your system — just like me (wink).
Since I have failed to dissuade you…
2. Figure out your cake sizes. How many guests will the cake need to serve? Does the couple want to take the top tier home for their anniversary cake? Sort these first. Take a look at cake serving guides online (Wilton has some good ones). You’ll see terms like Wedding Cut and Party Cut and be perplexed, so let me break it down for you. Regular layer cakes (“party cakes”) are shorter, usually 3 inches tall with frosting and filling. Imagine the grid/cutting guide from the top of the cake, looking down. A 2-inch by 2-inch slice — aka “party cut” — is generous. A wedding cake tier or is usually much taller, often 4″ to 4.5″” (but seriously, 4″ is really perfect and 5″ won’t fit on a lot of dessert plates). When cut into 1″ by 2″ slices (“wedding cut”), it’s not ungenerous; it’s, in fact, perfect. So, you get a lot more servings per cake.
Two really key things, though: One, don’t assume anyone cutting the cake knows how wedding cakes are supposed to be cut, no matter how many weddings have been hosted there. Print a guide out and bring it, explain it, and save yourself a lot of mental distress because the alternative is that slices come out too big, nobody finishes them, and then there’s not enough cake, adding insult to injury. Second, account for error. If you’re doweling the cake so it can be stacked, each of those dowels will cost you a slice or so. You want to plan for 20 extra slices, to play it safe. Besides, your cake will be amazing and people will want seconds.
I know you already know to do this (don’t you?) but please, make sure your oven can fit the pan size you want to use. If your wedding requires a 16-inch cake, it’s simply not going to come out of most home kitchens.
3. Settle on flavors. The first wedding cake I made was half chocolate with chocolate filling and half vanilla cake with mango curd filling and I made enough that each guest could try both. The second cake was a german chocolate cake. And here, my friends said they like salted caramel, brown butter, and vanilla. Figure out how you want to execute them — what kind of cake layers, what kind of filling, and frosting will best exhibit the flavors the couple loves. Nominate some recipes to audition.


4. Make a test cake. I usually use a 6-inch round cake to create a test cake but I make it in full, with however many layers and whatever kind of frosting the final wedding cake will have. Do as many test cakes as needed; there is absolutely no hedging on this. You must see and taste how it comes together. You must see if the layers plus the filling and frosting make the height you’d like the tiers to be. You want to see if the cakes shrink in the oven and how much; perhaps you’ll need larger ones. Smooth out your processes. Talk to friends who are good bakers, or make new ones. They may be able to offer you invaluable advice. (More on this later.) Get the proportions, flavors, and size right on your small cake, then scale it up for the entire cake size.
5. Create your final recipes. I don’t scale cakes by cups of batter, but by the area of the bottom of the cake. The reason I only use two-dimensional area and not three-dimensional volume is that I want my cake layers to stay the same height even as I change the size of the pan they’re in — i.e. I want each tier to be the same height, even if the cake diameters are different. The way we find area of squares and circles has not changed since grade school (but the calculators on our phones sure makes it easier). A 6-inch round pan has a base area of about 28 inches. A 9-inch has 64. A 12-inch, 113. It’s not perfect math, but I use these as a guide and put double the amount of batter in a 9-inch pan as I do in a 6-inch, and double it again for a 12-inch. Figure out what you’ll need for the cake pans you’ll use.
Don’t worry about ending up with funny numbers as you scale up or down, like 1.33 eggs. You can decide how you want to handle it (i.e. beating an egg and pouring in one-third of the mixture or just adding a single extra yolk) as you go. I’m more concerned about scaling up incorrectly, i.e. if you round the 1.33 eggs down to 1 egg and then multiplying it by 6 for a larger cake, you’d end up with 2 fewer eggs and possible, a different cake.
Fact: Cake math is the best math.
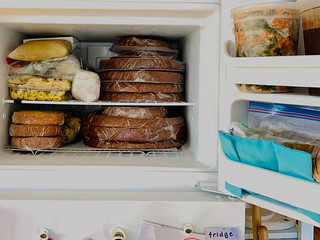
6. Find a schedule that works for you. Know how far in advance you can work based on how long each part of the cake will keep at peak quality. Cake layers, tightly wrapped in a couple layers of plastic, will be good for 1 to 2 weeks (and longer, but hey, fresh is the goal) in the freezer. The salted caramel filling we’re making here is good for two weeks, easily, in the fridge. The custard base for the frosting, easily 4 days. Figure out what order you want to make it in and what you’ll do with the parts until you’ll need them.
Always build in an extra day or two. If you’re on schedule, go take a nap. If you hit a snag you’ll be glad you have a “slush fund” in your schedule. Know what kind of baker you are. Some people go for it — start the morning of the day before the wedding. But I lack that stamina and don’t want to be tired when my focus is needed the most. I prefer to do a little each day; I prefer to be done at least half a day before I deliver it, especially if you’re also a guest at the wedding, wouldn’t it be nice to arrive without buttercream in your hair and a vacant expression in your overtired eyes? Find out who to connect with (i.e. not the bride(s)/groom(s), leave them alone on their wedding day) to deliver the cake and when they can accept it, and schedule your time backwards from there.
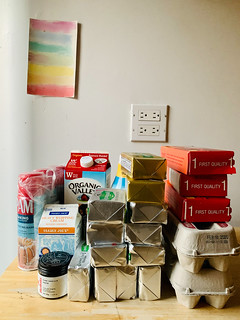

7. Buy all the materials and ingredients you need. What kind of materials? A box to transport the cake in (and remember, it should fit the cake board size, not the cake itself). A drum (thicker, more decorative cake board) that it might sit on. I find having several extra plain cake circles helpful when I need to stack the layers without bending their shapes, as well to move the cake layers around. Will your cake require dowels? Kits are inexpensive and easy. Think you’ll need a cake cone or core for a larger layer? (Read more about them here).
This is not the time to skimp on things that will make your life easier. My 12 year-old serrated knife was pretty dull; I bought this new one to easily zip through layers. I needed a whisk that would better reach into the corners of pans for the caramel and custard and bought a small and large of this (it was sold in a set at the time. I have used them almost every day since, and not just for baking.) Pre-cut parchment rounds to line pans are worth every penny (these came in a nice folder, making storing extras neater). I bought a sturdy revolving cake decorating stand after borrowing one for my first wedding cake and am glad I did.
Then, shop for ingredients, either online or locally. I like to buy extra of everything, but not so much that I (ahem) am shamed by my cabinet, finding bags of expired coconut years after the wedding cake that used them. But I also live in a big city with several grocery stores in a few block radius; you do you. Go to the big box stores for reasonably priced butter, eggs, and more, if you have access to them. A few good things to know: A 5-pound bag of flour contains about 17 cups of flour. A 4-pound bag of sugar contains about 9 cups of sugar. A pound of butter is 2 cups; European packs of butter are usually half a pound or 1 cup but sometimes they’re an even 500 grams, which is a tablespoon or two more.
I bought a couple extras this time: a highly concentrated vanilla bean paste that came with glowing recommendations for the frosting (vs. procuring and opening a dozen vanilla beans) and I bought some milk powder, so I could make extra-toasty brown butter. (More on this in a bit.)
People often ask when it’s worth it to use extra-amazing ingredients and when it’s not. Here, I used three different kinds of butter. I found that in the cake layers, I could make browned butter from any basic butter and it was great. For the caramel, I used a salted European-style butter, but I do think basic salted butter probably would have been fine, too. For the frosting, I also used a European-style butter because it’s so butter-forward, the improved flavor is worth the splurge.

8. Get to it. Don’t worry; you’ll never question (or let anyone question) why bakery wedding cakes cost so much again.
Let’s talk about this cake
There are 61 one Celebration Cakes on this site and another dozen over my two cookbooks, and yet this is one of my favorite cakes I have ever made. To understand what makes this one amazing, it helps to consider what makes classic wedding cakes mediocre. Classic, very traditional wedding cakes are white cakes (you know, because white = “purity” aiee), and white cakes are often made with egg whites only, which yields a lightweight but somewhat sturdy/firm cake that is very easy to work with while maybe not tasting as wonderful as your favorite golden-hued birthday cake. Fillings can be more “interesting” along the lines of lemon curd or raspberry puree, but the frosting usually goes back to a pure white color, and for this Swiss or Italian meringue buttercream are the standards. They’re buttery, not very sweet, and pipe like a dream. They’re not, however, terribly exciting. The best case scenario for any of these elements would be top-notch ingredients but it’s unlikely that bakeries cranking out loads of wedding cakes are able to do it with a, say, Kerrygold budget.
This cake takes each of these classic elements and betters them, turning what could be basic into layers upon layers of nuanced flavors.


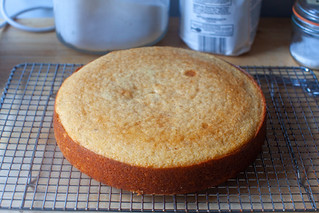
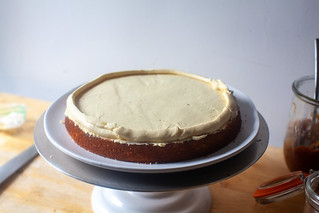
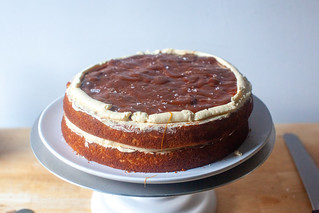
Cake layers: Each tier (although these were not stacked) is three layers of tender vanilla cake fragrant with brown butter. Brown butter is created by melting butter and continuing to cook it until any water content evaporates and the remaining liquid separates into butterfat and milk solids. The milk solids toast and become nutty and fragrant. Still, it’s a mild flavor and can be hard to get it to “show up” in a cake. To amplify it, I employed a technique in which you add additional milk solids in the form of powdered milk to the melted butter. Here, I added 1 tablespoon milk powder to each 1/2 cup of butter.
Because these cake layers are on the plush, fluffy side, I reverse-creamed them on the advice of Erin Clarkson, the talented baker behind Cloudy Kitchen. You can read more about reverse creaming here, but in short, it leads to flatter tops and a more even, plush crumb, making it more desirable for big layer cake projects.
I baked these cake layers at 325 degrees F (versus the usual 350F), which led to flatter tops, less shrinking in the pan, and a more even golden color all over.
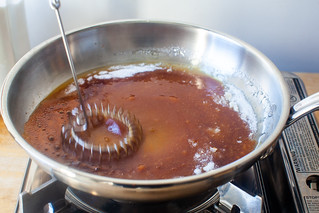

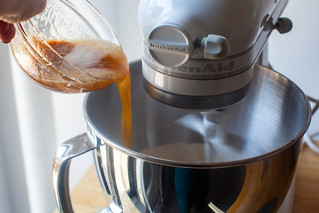
Filling: I think that a real, proper salted butter caramel sauce is a revelation to taste, and I wanted nothing short of this stop-you-in-your tracks deliciousness for the filing here. I aimed for a caramel that that was softer than a caramel candy (which, of course, would be a bit chewy) but firmer than a sauce (which would be runny and difficult to contain). I found that my go-to salted butter caramel sauce cook to about 245 degrees F did the trick perfectly. From the fridge in a bowl, it’s hard to scoop. Warmed up to room temperature, once it’s spread thin, it stays in place when the cake is slices but begins to trickle down the cake sides a couple minutes later, which I considered ideal.
Clarkson suggested that to keep the caramel from soaking into the cake, or even trying, I coat each cake with a thin layer of the frosting. I also piped a “dam” around — a ring of frosting that would ensure that the caramel wouldn’t trickle out the sides at any point. I got both cold enough that they were solid before filling the top with caramel.
I love sea salt flakes in caramel, but I find they don’t disperse reliably throughout the caramel and I didn’t want some slices to be very salty and some not salty enough. To avoid this, I used salted butter, which of course fully distributes but has a very subtle saltiness. After spreading the caramel, I sprinkled it evenly with sea salt flakes before putting the next cake layer on top.

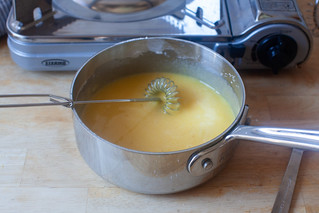

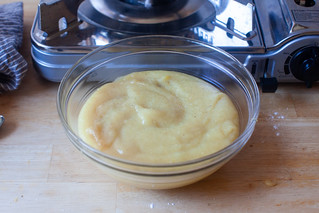


Frosting: Over the years, I’ve made so many delicious frostings but I couldn’t decide which one would be a real show-stopper here, and not just a pretty coating. Clarkson urged me to try a new-to-me frosting, German buttercream. German buttercream, or whipped vanilla custard frosting, is exactly that — a vanilla bean custard that you beat a tremendous amount of butter into. It’s absolutely glorious: not too sweet, fluffy but holds a shape easily, keeps really well with no notable loss in quality over a few days, rewhips like a dream, and tastes so good, it could convert even the biggest frosting skeptic. I ended up using a mash-up of Clarkson’s technique and Stella Park’s recipe on Serious Eats, but using a lot more vanilla bean in it, in the form of vanilla bean paste. (This stuff was wonderful and very concentrated.) I also used vanilla extract. They add different vanilla tones to the frosting and I encourage you to use both for the best flavor.


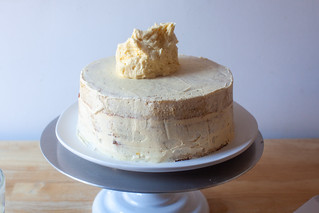
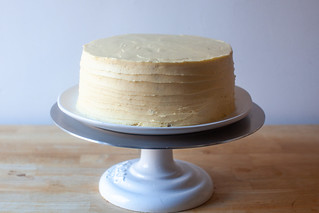
Assembly and decoration: Wedding cakes are traditionally stacked with hidden dowels that support the upper layers from falling in. This was deconstructed, with each tier on a separate cake stand (I don’t know the name for this style — the Meghan and Harry?). The bride sent me these two pictures from Pinterest to for inspiration, so I kept the cakes plain and let the florist decorate them with fresh flowers. But I’ve been promising you a tutorial for the buttercream flowers (and my one-bag, one-bowl method for them) them since the last wedding cake I made so I’ve added that below. [If you’re looking for tips along the lines of Layer Cakes 101, see this post.]

Ready to get baking?
I made my first flower-topped cake in 2018 for that German chocolate wedding cake that was naked cake-style (no frosting on the sides) and needed some prettiness on top. I was inspired by the stunning garden Molly Yeh had piped on top of her rose rose cake earlier that year. Alas, she hadn’t posted a tutorial on how she did it until a couple weeks after the wedding I needed it for (the nerve!), so — for better or worse — I was left to my own devices.
The internet is full of tutorials on how to make absolutely stunning buttercream flowers and more from pastry tips. This isn’t that. This is much sloppier; this is for people who like the look of flowers but also don’t want to work too hard for them. I have a feeling I’ll never convince you that my method is shockingly easy, but I’m telling you, it truly is. Here’s why:
1. Flowers Not Found in Nature: While you might be able to use Ateco Tip #79 to make a Lily of the Valley and Tip #150 to make Carnations, I’m never going to do that. Instead, I watched a few flower-making tutorials (these are wonderful), immediately scrambled them in my brain, and then just used various tips to make bloop and u’s and blobs in cone-d and concentric shapes and found that when surrounded with leaves in leaf colors from leaf-making tips, they’re surprisingly indistinguishable from Flowers Found In Nature, which is great because I’m coincidentally indistinguishable from a person who is going to feel bad if her posies don’t look like posies.
2. The One-Bowl, One-Bag Method: I was about to mix a small bowl of each color I wanted to use and set it up individual bags for each color when I was overwhelmed with a feeling I am extremely familiar with in projects where I’ve bitten off a lot: Must I? Do I haaaaave to? Isn’t there an easier way? And so I tried something else:
– Fit a single, large pastry bag with a coupler. A coupler allows you to switch decorating tips without having to change the bag.
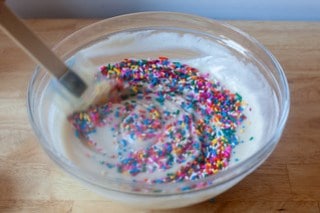
– Put a small amount of frosting in a smallish bowl. The more colors you’ll want to use, the less frosting you’ll need right now. I use a couple tablespoons at a time for this small cake shown here. Arrange the colors you’ll want to use in some sort of chromatic order. Tint this blob of frosting with the first one and put it in the bag.
– Put a tiny schmear of frosting on your flower nail. Place your first square of parchment on top. Pipe a bunch of blops, bops, or swirls into something flower-ish. Carefully pull the paper off the flower nail and put it on your tray.
– Make a few more flowers. Before the frosting in the bag runs out, add another scoop of plain frosting to the bowl and tint it with your next color. Mix it with any frosting left in the bowl from the previous color. Add it to the piping bag.
– Continue to make flowers. Change tips whenever you’re bored of the shape you’ve been using or go back to an earlier one. Add colors as needed. Instead of having distinct colors in each flower, you’ll have blends, ombre-ish. It’s much prettier, in my opinion; a lovely reward for this lazier method.
– When your tray is full, freeze it. If you think you’ll need a second tray of flowers to cover your cake, continue until you have more than you’ll think you’ll need. Very soon, the flowers will be solid and will be very easy to lift from the parchment squares and arranged on the cake.
– Tint some frosting in a leaf-y green. Place a leaf tip on your piping bag. (I’d probably first squeeze out any remaining flower color, since we want the leaves to be clearly leaf-like.) Use the leaf tip to fill in the spaces between the flowers. I have a couple leaf-ish tips and a couple shade of green in the set I have, so I moved between them.
More? Shortly, I will put up an Instagram Story of this whole process, which will probably make the frosting and decorating parts simpler. Update: Here it is! I’m thinking about going one further with this — an Instagram Live Q&A one day next week where you can ask me anything you want to know about wedding cakes and I, a not-expert but enthusiastic make-do-er, will do my best to answer them. I’ll keep you posted on a date/time for that.