
Rainbow Cake
This image courtesy of Evi Abeler
Editor’s Note: If you want to make a truly special birthday cake that will be remembered for years to come, then you will love this recipe for Rainbow Cake! Bright and filled with an assortment of vivid colors, this no-bake dessert recipe includes layer after layer of crispy rice treats. Use your favorite buttercream frosting and plenty of sprinkles to take this cake to the next level. This cake recipe is easy to make and is sure to delight your guests. You’ll want to use this delicious cake to celebrate every special occasion or milestone event!
Everyone’s dream birthday cake might not be a cake at all! This impressive-looking layer “cake” can be customized for any celebration by experimenting with different colors and decorations. I’m obsessed with the sprinkle mix on top, which I made by combining every variety of sprinkle I had in my pantry. Sometimes (always) more is more!
Makes1 cake, 8 inches in diameter and 8 inches tall

Ingredients
- Treat Recipes
- 1 F batch
- 3 cups of cereal
- 2 cups of marshmallows
- 1½ tablespoons of butter
- 5 drops of yellow food coloring
- 1 F batch
- 3 cups of cereal
- 2 cups of marshmallows
- 1½ tablespoons of butter
- 5 drops of green food coloring
- 1 F batch
- 3 cups of cereal
- 2 cups of marshmallows
- 1½ tablespoons of butter
- 5 drops of turquoise food coloring
- 1 F batch
- 3 cups of cereal
- 2 cups of marshmallows
- 1½ tablespoons of butter
- 5 drops of purple food coloring
- 1 F batch
- 3 cups of cereal
- 2 cups of marshmallows
- 1½ tablespoons of butter
- 5 drops of pink food coloring
- 1 F batch
- 3 cups of cereal
- 2 cups of marshmallows
- 1½ tablespoons of butter
- 5 drops of orange food coloring
- Special Ingredients
- 1 large tub (32 ounces) of buttercream icing (or two 16-ounce tubs of white icing)
- Assorted sprinkles
- Equipment
- Cake ring, 8-inch diameter
- Cooking spray
- Parchment paper
- Large stockpot
- Silicone spatula
Instructions
-
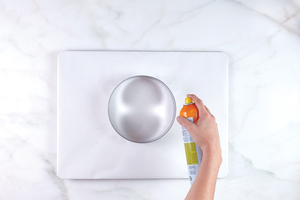
Coat the inside of the cake ring with cooking spray and place it on the parchment-covered work surface.
-
Mix the yellow F batch recipe: In a large stockpot, melt the butter over low heat until it’s 80 percent melted (see photo), about 1 minute 20 seconds. Note: If the butter begins to sizzle, lower the heat. It should melt very slowly.
-
Add the mini marshmallows and stir gently, coating them with melted butter, about 30 seconds.
-
When the marshmallows are about 80 percent melted (when you can still see the individual marshmallow shapes but they are beginning to run together), add the food coloring. Stir for another 15 seconds and then turn off the heat.
-
Stir gently until the color is well distributed but the marshmallows are still only about 80 percent melted, about 35 seconds (you should still be able to identify individual pieces within the melted ones). Note: If the marshmallows melt too much, the mixture will be too hot to handle—wait 1–2 minutes and then mold quickly!
-
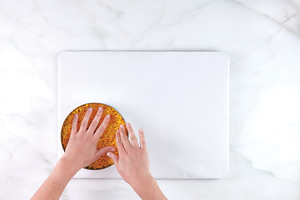
Add the cereal and mix well, until the marshmallows and cereal are fully combined, about 40 seconds. Do not overmix! Once done, pour the mixture into the cake ring. Generously coat your hands with cooking spray. Press to flatten until the mixture begins to firm up. Place the treat with the cake ring in the freezer while you repeat steps 2–6 to make the green F batch recipe. (Note: Each layer should stay in the freezer for at least 10 minutes.)
-
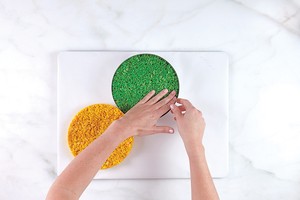
Remove the cake ring from the yellow treat (leave the treat itself in the freezer), and recoat it with cooking spray. Pour the green mixture into the cake ring and press to flatten until the mixture begins to firm up. Place the green treat with the cake ring in the freezer while you repeat steps 2–6 to make the turquoise F batch recipe.
-
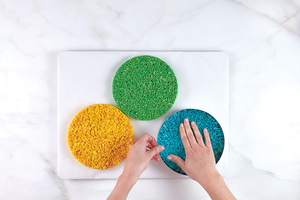
Remove the cake ring from the green treat (leave the treat itself in the freezer), and recoat it with cooking spray. Pour the turquoise mixture into the cake ring and press to flatten until the mixture begins to firm up. Place the turquoise treat with the cake ring in the freezer while you repeat steps 2–6 to make the purple F batch recipe.
-
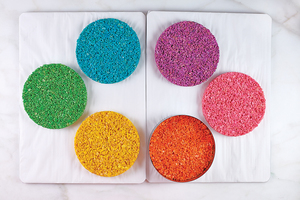
Repeat with the remaining purple, pink, and orange F batch recipes until you have six frozen layers.
-
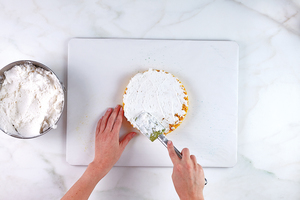
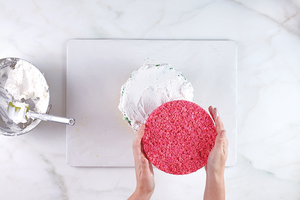
Determine the order in which you’d like the six treats to be stacked. Using the spatula, spread buttercream frosting over the top of the bottom layer, making sure to reach the edges.
-
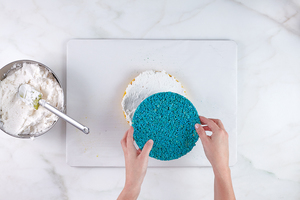
Carefully place a treat on top, for the second layer.
-
Spread buttercream frosting over the top of the second layer, and place another treat on top.
-
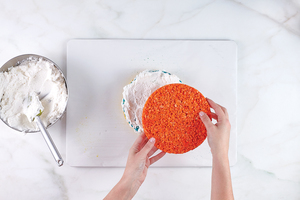
Continue in this manner until all of the layers have been frosted and placed.
-
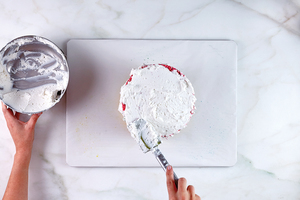
Spread one last layer of frosting over the top layer, making sure to reach the edges.
-
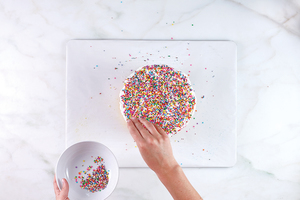
In a bowl, use your hands to mix together the different varieties of sprinkles, then sprinkle them over the frosting.
Are you looking for more easy cake recipes? We have you covered in this collection of 18+ Easy Cake Recipes: Birthday Cakes and More
Copyright 2017 Jessica Siskin
You May Also Like

YOUR RECENTLY VIEWED RECIPES
We are adding your Comments. ![]()
Thank you! Your comment has been added.
We are sorry. There was an error tyring to post your rating and review.
Your comment will appear after our editors have had a chance to review it.