
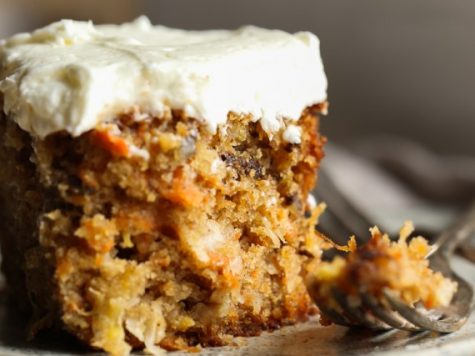
If you’ve ever made a cake before, then you might look at the recipe for our Easy Sheet Cake with Chocolate-Cream Cheese Frosting recipe and say to yourself, Wait a second, this is DEFINITELY not how you make a cake. And, well, you’re not wrong. Most cakes start by “creaming” butter and sugar, a process in which butter and sugar are beaten together until the mixture is light and fluffy. The creaming process, which works air into the butter and helps leaven the cake during baking, is usually the key to successful cake-making—but this recipe goes way off script and skips it all together. Instead, we used a method pioneered by the doyenne of cake-making, Rose Levy Beranbaum, called “reverse creaming” or “two-stage creaming”—and the result is the kind of tender, finely-textured, and best of all, easy sheet cake that birthday dreams are made of. (If this all sounds kind of nerdy, that’s because it is.) Here’s why this weird recipe works.
Easy Yellow Sheet Cake with Quick Chocolate Frosting
Our recipe starts with all the dry ingredients in a bowl—your flour, your baking powder, your salt, etc. (Sugar, while usually treated as a “wet” ingredient, is in there too.) To this mixture we add room-temperature butter and work it into the flour mixture with a hand mixer. You can use a stand mixer with the paddle attachment, but this recipe is forgiving enough that a hand mixer is all you need. Room-temperature butter is key; if it’s not soft enough to be easily spread over a cold piece of toast, it won’t incorporate easily into the dry mixture.
The goal is to disperse tiny bits of butter throughout so that the fat coats the flour. This is crucial to the success of the recipe because fat inhibits gluten formation. Gluten—the elastic strands that give bread its chewy texture—forms when certain proteins in flour interact with water, which is desirable in bread, but not tender cake. Because the butter helps protects against gluten development, this cake recipe turns out stellar despite calling for all-purpose flour (which has more gluten) instead of the more standard cake flour (which has less). This wacky “reverse creaming” technique basically allows you to use the cheap-o flour you probably already have in your pantry, but produces a result more like what you’d get if you actually went through the trouble to leave the house and buy cake flour. Cool!
Regular ol’ all-purpose flour is all you need to make the birthday cake of your dreams.
After the fat is worked in, we add a portion of the wet ingredients, which have been whisked together in a separate bowl: buttermilk (for tenderness), vanilla, eggs, and a bit of oil (to keep things moist). The goal at this stage is to hydrate all the dry ingredients and make sure everything is evenly mixed. Then the remaining wet ingredients are added and we crank up the speed on the mixer. Although a lot of gluten makes cake tough, a little bit is necessary to give the cake structure. At this point, you actually want to beat the batter until it’s light and thick in order to work in a little extra air and develop a bit of gluten. You don’t want to over-mix by any means, but your risk of doing so is reduced by that “reverse creaming” business.
One of the advantages of this method—besides making it an incredibly easy, two-bowl operation—is that cakes made by “reverse creaming” tend to bake flatter, with less of a dome. This is especially helpful when you’re making a sheet cake. Since you’re not taking the cake out of the pan and trimming it, it’s nice to have it come out of the oven with a flatter surface that’s ready for that chocolate-cream cheese frosting. The method is pretty genius, and we’re all indebted to Rose for her brilliance. Sometimes there is dogma in baking and sometimes there is not—you just have to know when to break the rules and when to follow them. Go forth and bake!