What is kombucha?
Kombucha is a fermented drink made from sweetened tea, with a history going back a couple of thousand years through China, Japan and Tibet – although its exact origin is unknown. Its popularity spread through Russia, then the States and is now becoming more widespread in the UK.
While mainstream carbonated drinks are usually a mixture of sugar, carbonated water and artificial flavours, kombucha is truly alive – it’s carbonation comes from fermentation, and it has natural flavours. It only takes a sip of a real kombucha to discover the difference.
Learning how to make kombucha is a journey of discovery. Not only will you have your very own microbiology project, but you are in charge of the ingredients and flavours that you use.
What is a scoby and where can I get one?
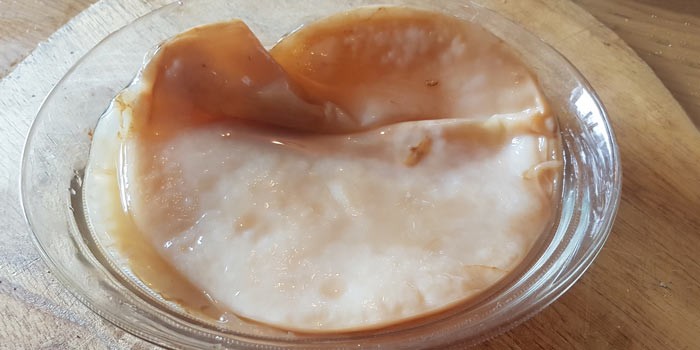
‘SCOBY’ stands for a ‘symbiotic culture of bacteria and yeast’. It is a disk-shaped culture which facilitates the fermentation process whereby sweet tea is converted to kombucha. It generally floats at the top of a kombucha batch, but do not worry if yours sinks to the bottom, it is still active.
The cheapest method is to ask friends or relatives who make kombucha, as they’re likely to have new scobys that they can donate to you. If you don’t know anyone who already makes it, you can either attend a course where they provide scobys or buy one online. The scoby will survive a trip through the postal system without problem, but it is a good idea to get it into a solution of fresh tea at the earliest opportunity.
However you acquire your first scoby, it should come with some liquid, which will be added to the first batch. This liquid is very important as it contains not only a large quantity of bacteria and yeast but also a lot of acid which helps create the right environment for the next batch.
More like this
Each scoby is unique and is the result of the environment it has been kept in. The scoby will be home to many different yeasts beyond the well-known bread and beer fermenter, saccharomyces cerevisiae, such as brettanomyces bruxellensis and schizosaccharomyces pombe as well as many species of bacteria that help to increase the acidity and limit the alcohol content.

Equipment
You don’t need to buy expensive equipment to get started – you might even find you already have everything you need. A large glass jar is ideal as it allows you to see what is happening, although ceramic can be used if it has a food-grade glaze. Plastic and metal containers should be avoided. A wide-mouthed vessel is better as it gives more surface area and leads to a quicker ferment. A plastic funnel and plastic sieve will also be useful and a thermometer, especially one of the stick on strip variety, would be helpful.
Ingredients for making kombucha
You will need five ingredients:
• Water
• Tea
• Sugar
• A scoby
• Starter liquid
Choosing the right ingredients will result in a better tasting kombucha.

Water
- It is important to use de-chlorinated water as chlorine can have a negative effect on the microbes we wish to propagate. Tap water contains chlorine and will not be stripped out by an ordinary water filter so the water should either be boiled and cooled or left in a bowl overnight so the chlorine can dissipate naturally.
Tea
- Black tea is considered best as it contains the nutrients that the scoby likes. It can produce quite a full, fruity flavour but many people prefer to do a mix of teas such as half black and half green or white tea. Either teabags or loose tea can be used. Tea that has added oils such as Earl Grey should be avoided.
- There is a wide range of tea from the camellia sinensis plant which can be experimented with, such as Assam, Darjeeling, gunpowder, lapsang souchong, oolong, pu-erh, sencha and white tea.
- It is also possible to use other tea not derived from the tea plant such as rooibos, chamomile, chicory root, hibiscus, nettle, raspberry leaf, yerba mate etc. but it is a good idea to keep a quarter of the tea content as black tea either in each batch or every few batches. As you will be cultivating a living entity you want to make sure that you are giving it the best environment in which to grow so it makes sense to use organic tea where possible.
Sugar
- Ordinary cane sugar is normally used, less refined sugars will work but can lead to changes in flavour. It is not possible to brew kombucha without sugar as it provides the food that the yeast and bacteria need to reproduce, create a new scoby and process sweet tea into acids and vitamins and carbonation.
- Much of the sugar that remains in the kombucha after fermentation has already been broken down from table sugar (sucrose) into fructose and glucose. It is then transformed by bacteria into healthy acids and then enzymes break down the sugars reducing the amount even further. Using too little sugar can starve the scoby.
- The longer kombucha is fermented the less sugar will remain. Artificial and sugar substitutes will not work as they do feed the bacteria or the yeast. Honey should not be used as it will introduce different yeast and bacteria cells, although there is a separate type of kombucha, called jun, which thrives on honey.
Scoby
- A scoby should be from a good source and should not have been dried or kept in a fridge. The size doesn’t have to be too exact, a small one for a small batch, a medium one for a medium batch. The shape is not important as a new scoby will form at the top of the vessel.
Starter liquid
- When starting a new batch of kombucha it is necessary to add some starter liquid, usually taken from the top of the previous brew which would make up 10% of the quantity of the new batch. This lowers the pH of the tea – kombucha has a pH in the range of 3.5 to 2.5 compared to around seven for tap water. The lower the pH number the more acidic, but there is no need to actually measure the pH as you will be able to taste the acidity. The starter liquid protects the sweet tea from harmful microorganisms like mould or kahm yeast.
- To maintain a healthy balance in the kombucha it is best to take the starter liquid from the top of the previous brew, where bacteria proliferate, rather than the bottom where the yeast dominates. The addition of the starter liquid helps to get fermentation going quicker and shortens the brewing cycle.
- The starter liquid is as important as the scoby, in fact a brew with starter liquid and no scoby would be more effective than a brew with a scoby and no starter liquid, but having both is always the preferred option.

Basic kombucha recipe
- This ‘batch method’ is an easy way to get started. You make a batch, use it all except for enough liquid to provide for the starter liquid and then make a fresh batch.
- There is no standard so we have included a broad range for sugar, we tend to go for between 55-80g per litre, so midway is a good place to start. More sugar will mean a longer fermentation period but will give more body. To end up with less sugar it is not necessarily a question of starting with less but fermenting for longer.
Ingredient quantities

Method
- Boil a quarter of the total water in a saucepan, turn off the heat and add the teabags and the sugar, give it a quick stir to dissolve the sugar and leave for 6-10 minutes to brew.
- Remove the teabags from the solution, but don’t squeeze them as it can cause the brew to be bitter.
- Add the remaining quantity of cold de-chlorinated water. This will make sure that the solution is not hot, as anything above 35°C will harm the scoby.
- Add the scoby and the starter liquid that the scoby has been sitting in. There should be a minimum of 5 cm left at the top to allow for fermentation activity and scoby growth.
- Cover the jar with a cloth or a paper towel and an elastic band to prevent dust and fruit flies from getting in. The jar should not be closed as the scoby needs to breathe. Label the jar with the date and contents such as the mix of tea used. Masking tape is good for this as it comes away easily.
- Leave to ferment for 6-9 days at room temperature away from radiators, the oven or direct sunlight – a kitchen work surface usually works well. It does not require complete darkness, a little light is fine as long as it isn’t direct sunlight. Do not put it into a cupboard as air circulation is important.
- After this stage it should be ready to start a “secondary fermentation”.

What temperature should I brew kombucha at?
Normal room temperature will be fine (above 21°C), but the ideal temperature range is considered to be 26-27°C. Fermentation slows down at 18°C, while above 30°C the yeast proliferates and leads to greater alcohol production. If you want to hit the ideal temperature you will need to employ a heating method. The best is a heating belt from a home-brew shop which would go around the vessel and heat from the sides. Heating from the bottom can make the yeast too active.
When is the kombucha ready?
There is not an exact point when we can say that it is ready. Kombucha starts as a sweet liquid but as it ferments it becomes more acidic so it is down to personal preference as to when it hits the level of acidity that you like. After six days, you can start start sampling the kombucha each day to see how it changes. If it is too sweet then simply leave it for longer. For this reason some people would judge a batch to be just right after six days whilst someone else might go for nine or 12 days.

What is ‘primary fermentation’ and ‘secondary fermentation’?
- Primary fermentation is the first stage – this is all you need to do if you like the kombucha flavour as it is, and a lower level of carbonation.
- Secondary fermentation is the second stage, where the kombucha is fermented in a bottle. This is preferable if you want to add different flavours or if you prefer a higher level of carbonation.
- The best bottles are the variety of flip-top ones which can withstand pressure, as opposed to decorative ones. The bottle should be washed well. The kombucha can then be decanted into the bottle using a plastic funnel and a plastic sieve to stop any bits getting in.
- The flavour options are literally endless. Different fruits and vegetables can be added either fresh, in pieces, from frozen, dried or in juice form. Herbs and spices can also be added. The quantities of flavourings will depend on whether you are aiming for a subtle or an intense flavour, but around 5-10% is usually enough for fresh fruit – around 2-3 tablespoons for a litre.
- Cut fruit or herbs into pieces, add to the bottle and then top up with kombucha, leaving four fingers of headspace to allow for the build up of carbon dioxide. The bottle can then be left at room temperature for a day for the yeast to convert more sugar into carbon dioxide, (this is called ‘conditioning’) then it can be transferred to the fridge, to halt the process and stop the bacteria from creating more acid.
Some flavour ideas…
- Any fruit either by itself or in combination such as a mixture of berries. Berries such as strawberries, raspberries, blackberries and stone fruit like cherries, peaches or plums are great and will give a pretty colour after a day or so. Citrus fruit can be used as pieces, juice or the zest (from unwaxed fruit). Exotic fruit such as guava, kiwi, kumquat, mango, papaya, passion fruit and persimmon.
- Dried fruit such as cranberries, goji berries, dates and figs are good, but avoid raisins and others that have been soaked in oil, or apricots, or anything that contains sulphur dioxide as it can cause a rotten egg smell!
- Frozen fruit works well as the process of freezing creates ice crystals that break up the cell structure of the fruit, meaning that more of the flavour and colour get taken up by the kombucha. You can also use juice or purée.
- Herbs such as lavender and lemon balm can be used by themselves, or in combination with a fruit such as apple and mint, strawberries and thyme, raspberries and basil.
- Mild spices in moderation either singly or in a blend, or to complement a fruit, including: turmeric, burdock, allspice, cardamom, cinnamon, coriander, cloves, ginger, star anise, peppercorn, juniper and liquorice.
- Hot spices like cayenne or jalapeño. Ginger goes well with apple or turmeric.
- Vegetables such as beetroot, carrot or cucumber are great for savoury flavour. Garlic can be great to give a kick to something else, or it goes well with lemon. Mushrooms will also work – why not try some shiitake for heartiness.
- Other things that can work well are brewed coffee, cacao powder, maca powder, coconut water, rosehips, rose petals and tamarind.

What is a ‘scoby hotel’?
Each time you make a batch of kombucha a new scoby will form. At first, the layers can be left together but when it gets too big the layers can be easily separated using clean hands. Spare scobys can be transferred to a scoby ‘hotel’, which is simply a jar with some kombucha liquid for the scobys to float in and a cloth lid fitted. This is a stable environment and the scobys will be happy here, but check from time to time that they don’t dry out. It is always good to have back-up scobys in case something goes wrong with your main scoby or to use in experiments with new teas. Old scobys that have been used in eight or more batches can be composted in favour of newer ones.
What is the alcohol content in kombucha?
There is a little alcohol created during fermentation but it is usually around 1% or lower, which is similar to the amount in unpasteurised fruit juice. It is hard to accurately measure the alcohol content of kombucha as the methods used by beer brewers and wine makers will not give an accurate reading. However as kombucha ferments, the lactic acid bacteria continue to convert alcohol into acids thus reducing the amount still further.
How to avoid problems with kombucha – safety tips
Making kombucha is fairly easy and it is unusual to have problems but sticking to a few basic rules will help you to avoid most problems:
- Keep everything clean, rinse well after cleaning.
- Use a glass or food-grade ceramic vessel, that can withstand acidity. Avoid plastic. Stainless steel can be used but it should be grade 304 or higher.
- Use chlorine-free water.
- Use ordinary sugar and never sweeteners.
- Use good-quality tea, organic if possible.
- Use starter liquid taken from the top of the previous batch.
- Ferment in a warm location (Above 21°C, but below 30°C).
- Cover tightly with a cloth to keep fruit flies and dust out (as shown below).
- Keep spare scobys in a scoby hotel for back up.
- Discard any mouldy batches, including the scoby and the liquid.

Be cautious – pressure in bottles during fermenting
Fermentation leads to a build up of CO2, and when confined, this causes a build-up of pressure which can lead to exploding bottles. Always be careful when handling or opening kombucha bottles and keep them away from children.
Some top tips to avoid this problem:
- Always bottle kombucha after the main fermentation has taken place
- Choose bottles that are designed to withstand pressure, such as some flip-top bottles and some beer bottles
- Leave adequate headspace at the top of the bottle – about four fingers’ worth
Adding fruit to the secondary ferment brings in a new source of sugar which the yeast feed on creating the carbon dioxide that we want for carbonation. If the bottle is too full, or there is too much sugar added, some bottles will gush on opening, so it is good practice to open over a sink. Bottles taken from the fridge are less likely to gush as the cold temperature helps to keep the carbon dioxide in suspension. If you are worried about a bottle, put it somewhere where it will not do any damage if it were to break and wrap in a towel.
What can go wrong when making kombucha?
Hopefully each batch will come out just right but sometimes something might go awry. These are the things that can happen and the tweaks you can make to correct them:
My kombucha scoby isn’t fizzy enough
If there aren’t enough bubbles in the primary ferment, the kombucha can appear lifeless. This could be the result of fermenting at too low a temperature, so moving the fermentation vessel to a warmer place can help. If this persists, then for the next batch, draw starter liquid from the bottom of the vessel as this contains more yeast cells and should result in more carbonation. If there isn’t enough carbonation make sure that the bottles are first left at room temperature for at least a day before transferring to the fridge. Next time, try bottling the kombucha a bit sooner when it is still a bit sweet as it will have more food for the yeast. Make sure that the bottles are properly sealed otherwise the carbon dioxide will escape leaving the kombucha flat.
My kombucha scoby is too fizzy
If you are having problems with gushing bottles make sure that you open them after they have cooled to fridge temperature as this helps to keep the carbon dioxide in suspension. Cut down on flavourings, especially juice that contains a lot of sugar and make sure that the primary fermentation isn’t at too high a temperature – above 28°C can lead to the proliferation of yeast activity.
My kombucha scoby isn’t growing
A new scoby should form at the top of the vessel (as shown below). At first, it will be see-through or might look like mould, but give it a bit longer and it should thicken up into a nice creamy white disc. If this does not happen it may be that the temperature has been too low, that the original scoby was too small or there wasn’t enough starter liquid. Scobys can be damaged by being stored at too cool a temperature, such as in a fridge, or being allowed to reach a high temperature of 40°C or more.

My kombucha is showing signs of ‘kahm yeast’
This appears as a white film on the surface and might be wavy, it will look different to a new scoby. It is not harmful but it is best to dump this batch and start again with a fresh scoby. It can happen if the kombucha solution was too weak.
My kombucha is showing signs of mould
Mould is a sign that something has gone wrong and this batch should be dumped and a new batch started with a fresh scoby. At first though a new scoby or a lump of yeast can be mistaken for mould so it is best to wait until you are sure. Mould can usually be recognised as distinct round or misshapen patches and can be powdery or furry, and the colour can be white, grey, green or blue. Mould results from some form of contamination such as an unclean vessel or from the environment around the vessel. It can take hold when the kombucha brew is not acidic enough so make sure at least 10% of the brew is strong starter liquid.
How can I keep away fruit flies?
These small flies love anything that ferments and given the chance, they will get into the brew vessel and lay eggs from where things go downhill. If this happens, dump the batch, start again with a fresh scoby and starter liquid from the scoby hotel and make sure to seal the vessel with a tightly woven cloth as the flies can get through loosely-woven material.
How much kombucha is safe to drink?
Kombucha contains live microbes and so, like with any live food or drink, it is often advised to start slow whilst your digestive system adjusts. For kombucha, something like 100ml a day for the first week and then, build up from there. Like any drink or food it will not suit everyone. In particular, it is not advisable for people who are histamine intolerant, but apart from that, it depends on the individual.
How to keep improving your kombucha
When brewing kombucha we expect a little natural variation – in summer, the warmer temperature will move things along quicker and favour some microbes over others. Nevertheless we can improve by continuing to experiment with new teas and flavouring combinations and by keeping a brief brew log in a notebook. If you make a batch that you really like, it helps to have a record of how it was made and what went into it.
Finally, don’t forget to spread the joy and share with friends and family and when passing on scobys and starter liquid, pass on the instructions, too.
Discover more about fermented foods
The health benefits of kombucha
Kombucha glossary page
The health benefits of kefir
Beginner’s guide to fermented foods
The health benefits of fermenting
Simple sauerkraut recipe
Have you tried making kombucha? Leave a comment below…
Written by Simon Poffley (The Fermentarium) and Alyn Norris (The Happy Gut Hut).
All health content on bbcgoodfood.com is provided for general information only, and should not be treated as a substitute for the medical advice of your own doctor or any other healthcare professional. If you have any concerns about your general health, you should contact your local healthcare provider. See our website terms and conditions for more information.
