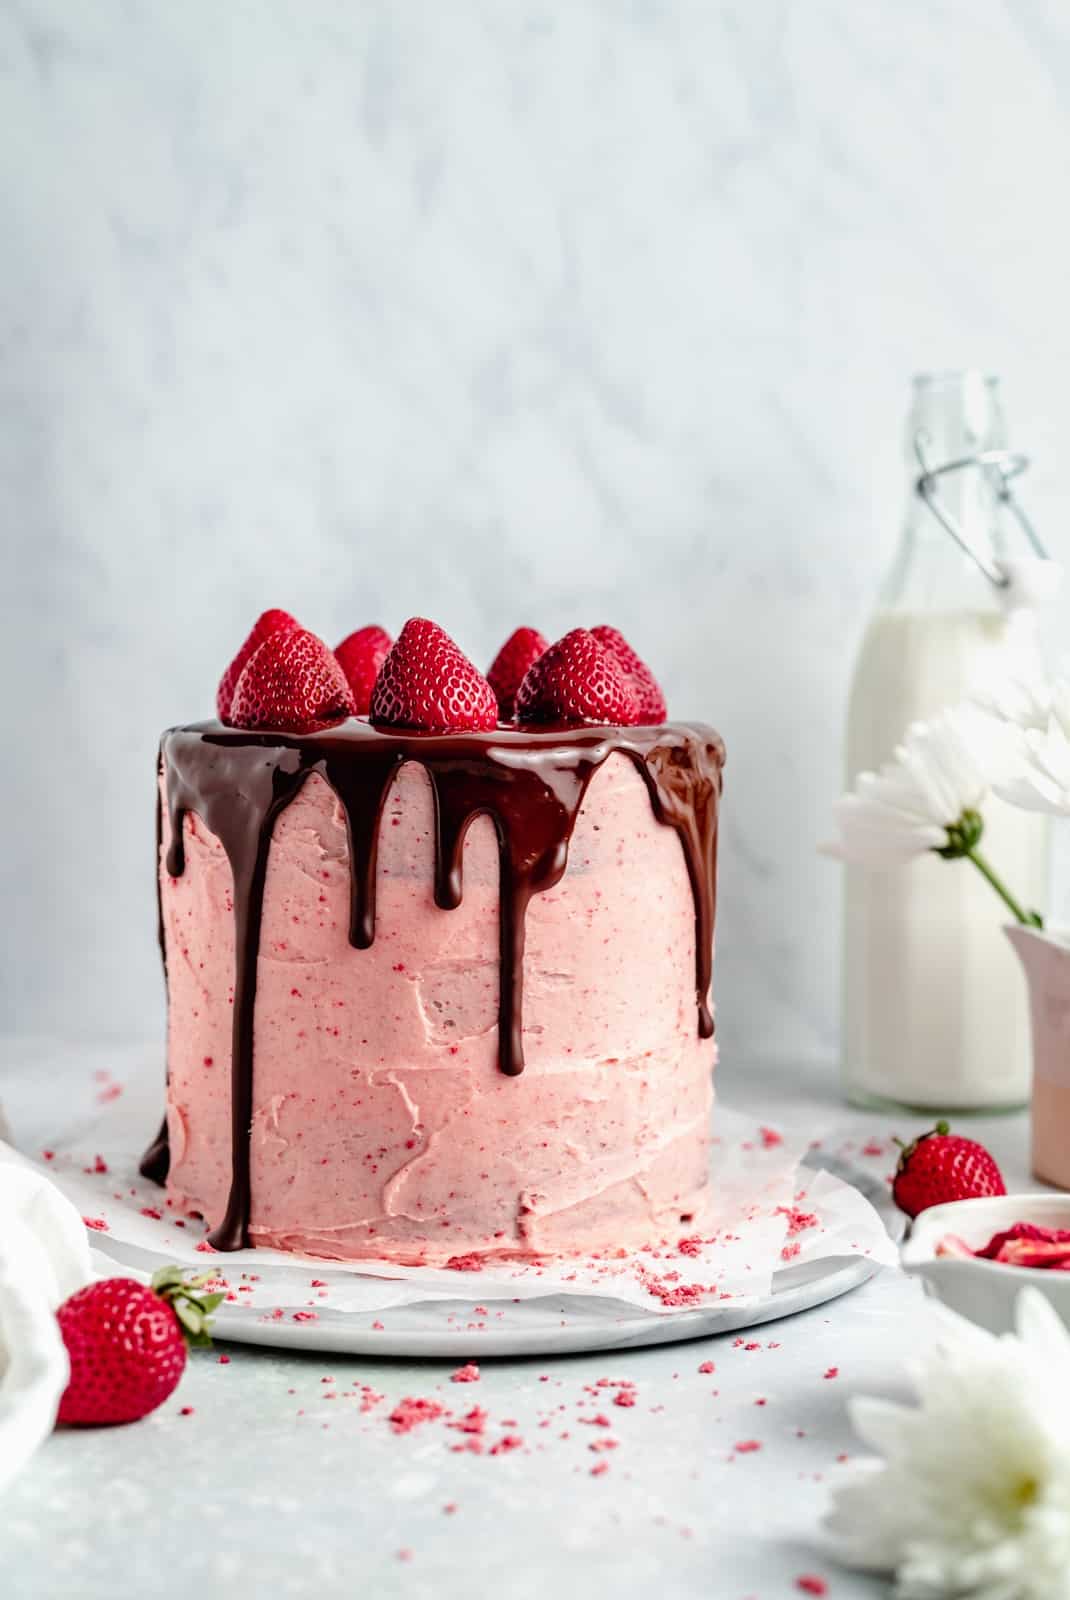
A chocolate brownie meets a chocolate covered strawberry, they fall in love and BOOM! This cake is born: a grain free chocolate brownie cake that’s moist, fudgy and dense; covered with a beautiful strawberry buttercream, drizzled with melted chocolate and finished off with fresh strawberries.
Yes, this cake is just as delicious as it is beautiful… and guess what? This chocolate strawberry cake is gluten free, grain free and easily dairy free. Perfect for Valentine’s day for your sweetie, or for any special occasion. I know you’re going to love it.

Everything you’ll need to make this chocolate strawberry cake recipe
This wonderful gluten free chocolate strawberry cake requires just a few wet ingredients, a few dry ones and an easy strawberry buttercream that you’ll fall in love with. Here’s everything you need to make it:
- Eggs: you’ll need 4 eggs in this cake recipe to give it the right texture. I haven’t tested this cake with flax eggs, but let me know if you do!
- Sweetener: this strawberry chocolate cake is naturally sweetened with coconut sugar and some pure maple syrup. Use both to make sure the cake is the perfect, fudgy consistency.
- Almond butter: using a natural, creamy almond butter creates an even deeper flavor and great texture. See below for more options I recommend.
- Coconut oil: we’ll also need some melted and cooled coconut oil for extra moisture, or feel free to sub melted butter or melted vegan butter.
- Almond flour: to keep the cake gluten & grain free you’ll need to use a fine, blanched almond flour. Sorry, there are no substitutions for the flour.
- Cacao powder: for that rich, dark chocolate flavor we’re using unsweetened cacao powder. If you don’t have cacao, use a good quality unsweetened cocoa powder.
- Baking staples: you’ll also need some vanilla extract, baking soda and salt.
- Toppings: this cake isn’t complete without that gorgeous homemade strawberry buttercream frosting. Feeling extra fancy? Drizzle the chocolate ganache made from chocolate chips and a bit of coconut oil, and top with fresh strawberries!

That luscious strawberry buttercream
Can we just admire how gorgeous that strawberry buttercream frosting is? The best part is that it’s so simple to make! Get the full recipe, tips & tricks for making it here. (Hint: it can easily be made dairy free!)

Easy ingredient swaps
Out of a few things? Feel free to make these simple swaps in the strawberry chocolate cake:
- Instead of coconut sugar you can use regular brown sugar.
- Try swapping the almond butter for a chocolate almond butter, chocolate tahini or chocolate hazelnut butter for even more chocolate flavor!
- If you don’t have cacao powder, regular unsweetened cocoa powder will work out well.

Can I use regular flour?
I would not recommend using any other flour in this recipe besides the almond flour as the texture will drastically change. This cake is meant to strictly be made with almond flour for the proper texture and flavor.
Can I make it dairy free?
Yes! This gluten & grain free strawberry chocolate cake can also be made dairy free. Just swap the regular butter in the frosting to a vegan buttery stick, and use dairy free chocolate chips for the ganache.

Tips for making this gluten free chocolate strawberry cake
- Tools you’ll need: you need a few essential kitchen tools for this recipe including 9 inch or 6 inch cake pans, parchment paper, an offset spatula for the frosting, a good set of mixing bowls and a nice cake stand.
- Prevent sticking: it is essential to add both parchment paper and nonstick cooking spray to your cake pans to prevent sticking. Simply cut the parchment paper into a circle to place at the bottom of each 6 or 9-inch pan.
- Use room temp ingredients: be sure to let the eggs come to room temperature before using them in the recipe, otherwise the coconut oil will coagulate the batter. The coconut oil should be melted but not HOT, but rather closer to room temperature.
- Pack your flour: you’ll want to pack your almond flour just like you would with brown sugar. Do not pack the cacao powder though.

Tricks for frosting this strawberry chocolate cake
As I mentioned, the strawberry buttercream frosting truly makes this cake magical. Here are a few tricks for frosting it and making it beautiful:
- Let the cakes cool completely. Make sure to let the cakes cool completely before frosting them so that the frosting doesn’t soak into the cakes.
- Do a crumb coat first. Frost the layers as you normally would and then coat the outside of the cake with a very thin layer of strawberry buttercream. Then, place the cake in the fridge for 10-15 minutes before you finish frosting. This is so that the crumbs stick to this layer of frosting and not your main layer.
- Tips for the drizzle: If you’re adding the chocolate drizzle (which you should!) be sure to place the cake in the fridge after frosting it and before adding the drizzle. This will allow the chocolate to set properly on top.
Storing tips
This chocolate strawberry cake will stay good at room temp for a day or so, then should be placed in the fridge. It will stay good for 5-7 days in the fridge, and should be covered to ensure freshness.
Feel free to make the fully frosted cake or just the baked cake layers 1-2 days ahead of time and keep them wrapped in the fridge or freezer! It will still be delicious.

Freezer-friendly chocolate strawberry cake
Feel free to freeze this chocolate strawberry cake either frosted or unfrosted for up to 2 months. I recommend freezing it unfrosted and in individual layers for best results:
- Once the cakes are cool, simply wrap each individual layer in plastic wrap & aluminum foil.
- Place the cakes in a zip-top freezer bag.
- When you’re ready to serve it, thaw it in the refrigerator overnight and then let the cake come to room temperature before serving.
More cake recipes you’ll love
Grain Free Tahini Chocolate Chip Cookie Cake
The Best Paleo Chocolate Cake with Paleo Chocolate Frosting
Damn Good Peanut Butter Banana Cake (gluten free, grain free)
The Best Healthy Carrot Cake You’ll Ever Eat (gluten free & paleo-friendly!)
I hope you love this wonderful inside out chocolate covered strawberry cake recipe! If you make it be sure to leave a comment & a rating so I know how you liked it. Enjoy, xo!
Inside Out Chocolate Covered Strawberry Cake
Total Time 1 hour 25 minutes
Beautiful inside out chocolate covered strawberry cake topped with a luscious, homemade strawberry buttercream frosting. This wonderful, grain and gluten free chocolate strawberry cake is easily dairy free and makes the perfect dessert for Valentine’s Day or celebrations! Add a drizzle of chocolate ganache for the ultimate indulgence.
- Wet ingredients:
-
4
eggs, at room temperature -
3/4
cup
coconut sugar -
½
cup
pure maple syrup -
½
cup
almond butter* -
1
teaspoon
vanilla extract -
¼
cup
melted and cooled coconut oil (or sub melted butter or vegan butter) - Dry ingredients:
-
2 1/2
cups
packed fine blanched almond flour -
¾
cup
unsweetened cacao powder (or unsweetened cocoa powder) -
1
teaspoon
baking soda -
½
teaspoon
salt - For the frosting:
-
1
batch of
Strawberry Buttercream Frosting - For the chocolate ganache:
-
2/3
cup
chocolate chips, dairy free if desired (we love dark chocolate!) -
1-2
teaspoons
coconut oil - To garnish:
-
6-8
whole strawberries, stems removed
-
Preheat the oven to 350 degrees F. Line the bottom of three 6-inch round cake pans or two 9-inch round cake pans with parchment paper rounds. Spray parchment paper and sides of the pans with nonstick cooking spray. YOU SHOULD USE PARCHMENT PAPER or the cake is likely to stick. Please do not forget.
-
In a large bowl, whisk together the eggs, coconut sugar, maple syrup, almond butter and vanilla extract until smooth. Slowly whisk in the melted and cooled coconut oil until it’s well incorporated. The mixture should be very smooth and well combined. Note: It is important that your eggs are at room temperature otherwise the coconut oil will coagulate. The coconut oil should be melted but not HOT, but rather closer to room temperature.
-
In a separate bowl, whisk the almond flour, cacao/cocoa powder, baking soda and salt. Add the dry ingredients to the wet ingredients and mix well with a rubber spatula until smooth.
-
Divide batter evenly between pans and spread out with a spatula to smooth the tops. Allow batter to sit in pans while your oven preheats. Bake for 17-28 minutes in the two 9-inch pans or 20-25 minutes for three 6-inch pans. Cakes are done when a tester comes out clean or with just a few crumbs attached. Allow the cake to cool for 15 minutes before removing from the pans and placing on a wire rack to finish cooling. The cake should be completely cool before you frost it. This is very important. Cakes can be made a day or two ahead if you’d like.
-
Make your frosting: first add your freeze dried strawberries to a high powered blender (or a food processor) and blend until they become a fine powder. Next, in the bowl of an electric mixer, add the softened butter (or vegan butter) and whip on high until light and fluffy. Next, add the freeze-dried strawberry powder, powdered sugar, vanilla extract and beat for 2-3 minutes more, starting on low speed and slowly increasing to high. Add in a few tablespoons of milk to thin the frosting out, beat again until smooth.
-
Now it’s time to frost the cake: place a few tablespoon tablespoons down onto the cake stand and spread over a few inches. Invert one cake onto the cake stand, add about ½ heaping cup frosting between each layer, repeat with each cake, then frost the top and sides of the cake with the remaining frosting. If necessary, you can do a crumb coat here: frost the layers as you normally would and then coat the outside of the cake with a very thin layer of frosting then place in the fridge for 10-15 minutes before you finish frosting. This is so that the crumbs stick to this layer of frosting and not your main layer. Once you are done frosting, place your cake in the fridge. This is important! The frosting needs to be somewhat cool so the chocolate drizzle will set properly on top.
-
To make the chocolate ganache drizzle: add chocolate chips and coconut oil to a microwave safe bowl. Microwave in 30 second intervals, stirring in between, until chocolate is smooth and completely melted. Remove cake from the fridge and pour over the top of the cake. It should naturally start to drip down the sides, but if it doesn’t, use a spoon to spread the chocolate a little towards the sides to create a drip look on the sides. Place whole strawberries on top of the cake and place in the fridge until chocolate hardens.
-
Cake will stay good at room temp for a day or so, then should be placed in the fridge. Cake will stay good for 5-7 days in the fridge, and should be covered to ensure freshness. Enjoy!
To store: I recommend storing the cake covered in the refrigerator for up to 5 days.
*Using a chocolate almond butter in this cake makes it even more delicious, or you can use chocolate tahini or chocolate hazelnut butter!
Feel free to slice up extra strawberries and place them in between the layers if you’d like.
To freeze: feel free to freeze this cake either frosted or unfrosted for up to 2 months. I recommend freezing it unfrosted and in individual layers for best results. First, wrap each individual layer in plastic wrap, then aluminum foil and then place the cakes in a zip-top freezer bag. When you’re ready to serve it, simply thaw it in the refrigerator overnight and then let the cake come to room temperature before serving.
Recipe by: Monique Volz // Ambitious Kitchen | Photography by: Eat Love Eats
